I had a great opportunity to film the start of the University Boat Race in Putney a couple of weeks ago. The resulting timelapse video can be seen on Youtube, or embedded above, but I just wanted to fill you in on how the video was put together. Before reading on, if you want to see the start of the boat races on the video the Isis-Goldie race (the reserves) is at 16:00 and the Oxford-Cambridge one at 16:31. The wide-angle view is from the start of the video to 1m 27s, and the closer view is from 1m 28s onwards.
 It would have been quite easy to position myself on the middle of Putney Bridge with a telephoto and take photos of the stake boat start from there, but I wanted something a little different. I wanted to have both a wide angle view of Putney Bridge and the starting point, to see the ebb and flow of the crowds before, during an after the races, and also a slightly closer view of the start of the race. So, I used two cameras using different focal lengths, one mounted on top of the other so that they both had the same point of view of the start of the race, and both set up to take a photo every few seconds for the duration of the shoot (technical details down below).
The nearby church of St. Mary’s offered a wonderful vantage point over the start of the race, and the staff were extremely helpful in letting me use the ancient tower for my shoot. There were a few minor challenges involved: the final section of spiral stairs near the top of the medieval tower are extremely narrow, steep and unlit. Awkward with a lot of camera kit. The crenellations of the tower also made it very hard to get a clear view over the whole area, so I needed to use a Magic Arm, resting on the parapet, to get the cameras into the right position. And lastly – it was freezing. Bitterly cold east winds with occasional snow flurries.
The final images were processed in Lightroom and exported with a timestamp (see here for my timestamp tutorial) as an mp4 video at 15 frames per second. If I had wanted to use some panning in the video then I would have used LRTimelapse, an excellent tool for panning and deflickering video for Lightroom.
Boring technical details are as follows:
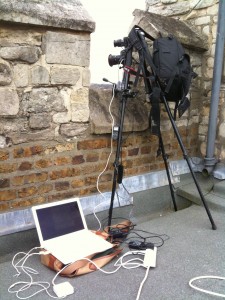
Camera 1: Canon 5D mkii with 17-40mm lens at 17mm, Aperture priority at ISO 400. Controlled by laptop running Canon’s EOS Utility, programmed to take a photo every 5 seconds, and download the image to the hard drive. I would have used small raw files (sRaw) if storage had been an issue, but as I was saving to the laptop rather than a memory card I could use full-size raw files. Using EOS Utility was a trade-off – I wanted to have an interval of three seconds (easily done using the Canon intervalometer), but I needed as much storage space as possible, i.e. save to the laptop. I couldn’t tether the camera using the intervalometer, so I was forced to use EOS Utility, which unfortunately had an interval limit of five seconds (come on, Canon, you can do better than that). So five seconds it was…
Camera 2: Panasonic GF1 with 14-45mm lens at 36mm (equivalent to 72mm), Aperture priority with Auto ISO, controlled by intervalometer to take photo every 3 seconds until the SD card filled up.
The GF1 was clamped to the hot-shoe of the Canon, and the Canon attached to a Manfrotto Magic Arm, which was in turn clamped to my tripod. I had both cameras running off the mains, as the cold would have drained the batteries far too quickly.

Leave a Reply