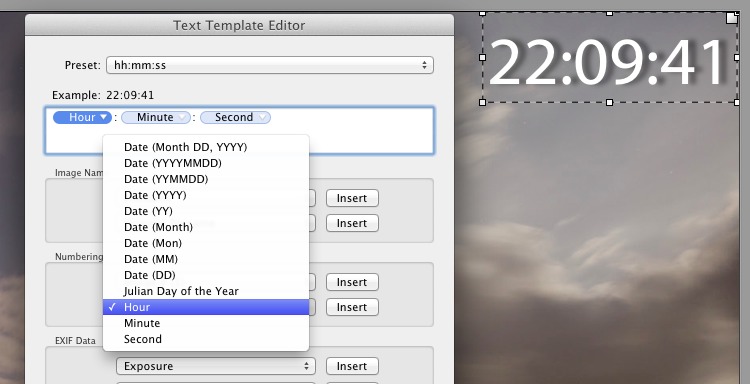
This mini-tutorial is really just about how to add a custom text field to an image in the Slideshow feature of Lightroom, so that an exported video contains a ‘digital clock’ showing the elapsed time.
What I often like to do for some of my timelapse movies is to add a timestamp to each image, which then appears as a ‘ticking clock’ in the final video. I mostly do this for reference purposes, so that I can tell at a glance how long the timelapse lasted for, and at what point something happened – aircraft flying overhead, a cow dropping dead in a field (yes, really). But also because I think it can just look cool.
The real magic is done by Sean McCormack’s fantastic Timelapse template (see here), which takes an image sequence in Lightroom Slideshow and exports it as an mp4 video.
So here’s what you do…
First go to Sean McCormack’s Lightroom Blog web site and read about the Timelapse template for Lightroom. If you like the sound of it, download and install the templates, using the instructions on Sean’s site.
Once you’ve done that, select the sequence of images that you wish to turn into a time-lapse movie, then Slideshow.
Click on one of Sean’s time-lapse templates. Then In the toolbar underneath the image (press ‘T’ to toggle the toolbar on and off if you can’t see it) click on ‘ABC’ (Add text to slide). Select Custom text, Edit
A text box will now appear over the image, which you can position and configure as you please. Use the Text Overlay and Shadow options in the Overlays panel on the right to change the look of the timestamp.
Select and insert Hours, Minutes, Second (or Date) from the Numbering section, and type a colon or separator of your choice in between each field.

When finished, go to the Preset drop-down list at the top of the Text Template Editor window and select Save Current Settings as New Preset…, and name your new preset (I called mine hh:mm:ss).
If you are happy with the final video, then don’t forget to create and save a new User Templates that you can save all your settings for next time.
That’s it. Now when you export the image sequence using Sean McCormack’s preset each image in the the timelapse will be timestamped, giving the appearance in the final video of a rapidly advancing digital clock.
[Edit: Links updated December 2013 to reflect move of Sean’s materials to Lightroom Blog web site]
Leave a Reply